A1200 Pc Prototype with floppy drive Building Guide
A downloadable project
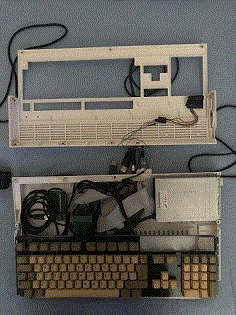
This is my project A1200 pc with real floppy drive working. It is a very modular project because you can change computer pieces by plug and play, usb cables etc. If the pc stick become obsolete you can use a new one with new Operating System and more space by swapping it inside the case. No soldering required.
The links are compatible items and can be changed with similar one. I have used to complete this computer an:
1) A1200.net white Case Amiga 1200 Case - A1200.NET
2) Keyrah for AMIGA and C64 Keyboard + his usb cable Keyrah V3 - icomp - en
3) Greaseweazle V4 Greaseweazle V4 - AMIGAstore.eu
4) PC Stick SiComputer with windows 10 NiPoGi Mini PC Stick, Intel Celeron N4000 Computer PC Stick Windows 10 Pro, 4 GB DDR4 64 GB eMMC Stick PC Supporto 4K HDMI, Bluetooth, WiFi, Mini computer : Amazon.it: Videogiochi
5) An AMIGA or PC to Amiga conversion floppy Drive or a PC Drive: check the cables to buy for Greaseweazle they are not equal for pc and AMIGA Floppy. https://www.ebay.it/itm/134548140876?hash=item1f53b1b34c:g:9nIAAOSwwMBkSoSS&amda...
6) 4 ports 2.0 USB HUB Amazon Basics - Ultra Mini Hub USB 2.0 a 4 porte : Amazon.it: Informatica
7) AMIGA 1200 or Kipper 2k Keyboard Tastiera Commodore Amiga 1200 UK buone condizioni testata 957 ingiallita | eBay
8) Software AMIGA FOREVER 10 Plus edition Amiga Forever - Amiga Software, Emulation, Games, History and Support Since 1986
9) USB and Hdmi cables 1 x Twozoh Cavo di estensione HDMI, HDMI maschio a femmina HDMI cavo, Nylon intrecciato HDMI Extender, HDMI 2.0 cavo adattatore supporto 4K a 60Hz 3D HDR (5M) : Amazon.it: Elettronica - 3 x Lindy - Cavo Prolunga USB 2.0 Anthra Line 0.5 Metri, Connettore USB Tipo A Maschio a Femmina, Velocità di Trasferimento Dati Speed Fino a 480Mbps per Tastiera, Stampante, Fotocamera, Hard Disk : Amazon.it: Informatica
10) Molex to HDD converted to floppy drive 5-12 volts 2A power supply. xTechnoMedia Alimentatore trasformatore Adattatore 12V 5V 2+2A Power Adapter connettore Molex HDD IDE Spina UE : Amazon.it: Informatica - 1 x Comeap 4 pin LP4 5,25" Molex maschio a 3,5" floppy Drive 4 pin femmina FDD cavo adattatore di alimentazione 19 cm : Amazon.it: Informatica
This Computer boot Windows 10 and then run the Amiga Forever interface
to run every AMIGA software from HDD or floppy image or real floppy.
This is a retro-modern Computer, If you are not at least an Hardware Technician with good preparation on new and old hardware dont try to build this project.
Building Instructions:
Take the buttom case part and screw the Keyrah, connect on Keyrah the leds cable and the flat green AMIGA Keyboard cable.Connect the Keyrah to the usb 2.0 hub and insert it inside the case connecting the hub to the usb of the Pc stick positioning the pc stick half a way inside a right port of the buttom case. Insert the Greseweazle and connect the floppy power supply with the floppy molex to floppy drive and not to Greaseweazle, remove the Greaseweazle floppy molex cable from it. It is not necessary anymore. Connect Greaseweazle to the 2.0 usb hub. and Connect the flat grey ata cable to floppy drive and Greaseweazle. This computer needs two divided power supply, one for floppy and for pc stick connected to energy. Use the remaining usb port of usb 2.0 hub with extension male to female usb cables to use external peripherials like mouse pen drive etc.
Software Configuration
Install Amiga Forever and register it. Under Amiga Forever Menu select Tools/Options/Profiles scroll the list till you find Floppy Drives Select Floppy 1 click over it and under PC device select FloppyBridge Then push Add and under Driver Select Greaseweazle. Under Mode (for me was good more compatible but you have to try with your disk). Under Cable Select, select the drive number that you use with gw command line tool for your drive to write floppy etc. Mine was good with number 0.
To run a Floppy insert it in the drive and under workbench 1.3 or 3.1 in Systems Columns under Amiga Forever select Edit with right click go to Media and in DF0 select DD Image Drive and in DF1 Select Phisical Drive 1 depending on your floppy this order can be inverted to have autoboot. Under Configuration/Compatibility select the right speed to run the floppy at the right timings.
This Project costed me a lot of money time and effort i passed with it a part of my life, i give the guide for free but i hope you all who follow me to remember me in the future in my most difficult moment.
Thank you for reading
Matteo
This Prototype is registered under Creative Commons License 4.0
I remove any responsibility for possible damage to hardware and software and people that you can cause yourself or others by creating this project, I also remind you that it is a non-commercial guide.
It is a guide made for a simple ILLUSTRATIVE purpose that I have created a working prototype and has no intentions of letting anyone create it.
To find information on CC 4.0 Licence read here:
Creative Commons Attribution 4.0 International | Choose a License
TRADUZIONE IN ITALIANO DELLA GUIDA:
Prototipo A1200 Pc con unità floppy Guida alla costruzione
Questo è il mio progetto A1200 pc con vero floppy drive funzionante. È un progetto molto modulare perché è possibile cambiare pezzi di computer tramite plug and play, cavi usb ecc. Se la chiavetta pc diventa obsoleta è possibile utilizzarne una nuova con nuovo sistema operativo e più spazio scambiandola all'interno del case. Nessuna saldatura richiesta.
I link sono elementi compatibili e possono essere modificati con uno simile. Ho usato per completare questo computer un:
1) A1200.net Copercho bianco https://www.a1200.net/amiga-1200-case/
2) Keyrah per AMIGA and C64 Keyboard + suo cavo usb https://icomp.de/shop-icomp/en/shop/product/keyrah-v3.html
3) Greaseweazle V4 Greaseweazle V4 - AMIGAstore.eu
4) PC Stick SiComputer con windows 10 https://www.amazon.it/NiPoGi-Computer-64-Supporto-Bluetooth/dp/B0B19WYZ6X/ref=sr...
5) Un drive floppy AMIGA o PC a Amiga o PC Drive: Controllare i cavi che si acquistano con Greaseweazle non sono tutti uguali per pc e floppy AMIGA. https://www.ebay.it/itm/134548140876?hash=item1f53b1b34c:g:9nIAAOSwwMBkSoSS&amda...
6) 4 ports 2.0 USB HUB https://www.amazon.it/AmazonBasics-Ultra-Mini-Hub-porte/dp/B003M0NURK/ref=sr_1_5...
7)Tastiera AMIGA 1200 o Kipper 2k https://www.ebay.it/itm/385701717378?hash=item59cd9d2582:g:2eAAAOSwtKRklDpz&amda...
8) Software AMIGA FOREVER 10 Plus edition https://www.amigaforever.com/
9) cavi USB and Hdmi 1 x https://www.amazon.it/Twozoh-estensione-intrecciato-Extender-adattatore/dp/B0B84... - 3 x https://www.amazon.it/Lindy-36701-prolunga-2-0-Tipo-Nero/dp/B07FPPT37C/ref=sr_1_...
10) Alimentatore Hard Disk con cavo Molex convertito a drive floppy 5-12 volts 2A power supply. 1 x https://www.amazon.it/dp/B07YQ79VGLpsc=1&ref=ppx_yo2ov_dt_b_product_details - 1x https://www.amazon.it/dp/B0837D3Y5Gpsc=1&ref=ppx_yo2ov_dt_b_product_details
Questo computer avvia Windows 10 e quindi esegue l'interfaccia di Amiga Forever
per eseguire ogni software AMIGA da HDD o immagine floppy o floppy reale.
Questo e' un Computer retro-moderno, Se non sei almeno un tecnico hardware con una buona preparazione su hardware nuovo e vecchio non provare a costruire questo progetto.
Istruzioni per la costruzione:
Prendi la parte sotto del case e avvita la Keyrah, collega sul Keyrah il cavo led e il cavo piatto verde della tastiera AMIGA. Collegare il Keyrah all'hub usb 2.0 e inserirlo all'interno del case collegando l'hub all'usb della chiavetta Pc posizionando la chiavetta pc a metà strada all'interno di una porta destra del case sottostante. Inserire Greseweazle e collegare l'alimentatore floppy con il floppy molex all'unità floppy e non a Greaseweazle,
rimuovere il cavo molex floppy Greaseweazle da esso. Non è necessario. Collegare Greaseweazle all'hub USB 2.0. e collegare il cavo ATA floppy grigio piatto all'unità floppy e Greaseweazle. Questo computer ha bisogno di due alimentatori divisi, uno per floppy e per pc stick collegato all'energia. Utilizzare le porta USB rimanente dell'hub USB 2.0 con cavi USB maschio a femmina di estensione per utilizzare periferiche esterne come pen drive del mouse, ecc.
Configurazione Software
Installa Amiga Forever e registralo. Sotto Amiga Forever Menu selezionare Strumenti/Opzioni/Profili scorrere l'elenco fino a trovare Unità floppy Selezionare Floppy 1 fare clic su di esso e sotto PC device selezionare FloppyBridge Quindi premere Aggiungi e sotto Driver selezionare Greaseweazle. Sotto modalità (per me era buono più compatibile ma devi provare con il tuo disco). In Cable Select, selezionare il numero di unità utilizzato con lo strumento da riga di comando gw per l'unità per scrivere floppy ecc. Il mio era buono con il numero 0.
Per eseguire un Floppy inserirlo nell'unità e sotto Workbench 1.3 o 3.1 in Systems Columns sotto Amiga Forever selezionare Modifica con il tasto destro andare su Media e in DF0 selezionare DD Image Drive e in DF1 selezionare Phisical Drive 1 a seconda del vostro floppy questo ordine può essere invertito per avere l'avvio automatico. In Configurazione/Compatibilità selezionare la velocità corretta per eseguire il dischetto alla velocita giusta.
Questo progetto mi è costato un sacco di soldi tempo e fatica ho passato con esso una parte della mia vita, do la guida gratuitamente ma spero che tutti voi che mi seguite vi ricordiate di me in futuro e soprattutto nei miei momenti più difficili.
Grazie per aver letto
Matteo
Questo prototipo è registrato sotto licenza Creative Commons 4.0
Mi tolgo ogni responsabilita' per eventuali danni a hardware e software e alle persone che possono causarsi o causare creando questo progetto, vi ricordo inoltre che e' un progetto fai da te non commerciale.
E' una guida fatta a semplice scopo ILLUSTRATIVO che ho creato un prototipo funzionante non ha intenzione di farlo creare a nessuno.
Per trovare informazioni sulla licenza consultare questa pagina: Creative Commons Attribution 4.0 International | Choose a License
| Status | Released |
| Category | Other |
| Author | Toolkitman |
| Tags | a1200-prototype, amiga-forever-10-plus, working-floppy-drive |
Download
Development log
- FloppyBridge winaue installation guideJul 19, 2023
- VR A500 winuae FloppyBridge SupportJul 19, 2023


Leave a comment
Log in with itch.io to leave a comment.